
General guidance for people who work on engines. For exact figures always follow the vehicle or engine maker's workshop manual.
Printable edition
The same guide in the Golden Bearing catalogue format, ready to print and pin up at the workbench.
Download the guide (PDF)How to read a bearing
If you only replace a failed bearing and never find the cause, the new one will usually fail the same way. So first read what happened.
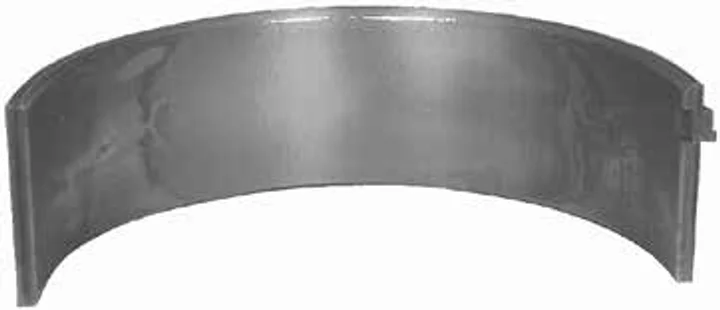
A normal bearing
- Signs
- Even wear over about two thirds of the running surface, lighter toward the parting faces and even across the width.
- What happens
- A bearing that has done its time wears a little. What matters is that the pattern is even, with no scoring, tearing or hot spots.
Reading it in four steps
- Look at the signs. Note where the wear is, its shape, the colour, any shine, cracks and particles, on both halves and on the backs.
- Understand what happened. Ask what broke the oil film or made the load uneven.
- Find the cause. Of the possible causes, pick the one that agrees with your measurements and with the state of the parts.
- Cure the cause. Then fit the new bearing; before that, repair or replace every part that is not right.
Dirt and foreign particles
Dirt is the biggest cause of bearing failure. It either travels in the oil or is left behind the bearing at assembly.
Particles in the running surface
- Signs
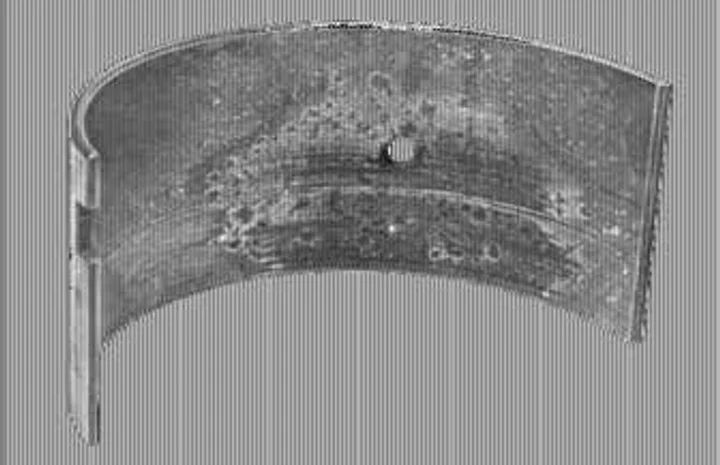
- Particles are embedded in the running surface; scoring may show too.
- What happens
- Dust, abrasive and swarf in the oil sink into the soft lining and make high spots. A high spot rubs the journal, and a half-embedded particle works like a grinding stone and slowly breaks the lining down.
- Causes
- The engine and parts were not cleaned well enough before assembly
- Dust entering through a faulty air filter, the intake or the crankcase ventilation
- Dirt that got in while working on the vehicle
- Wear of other parts putting swarf into the oil
- Oil and air filters not changed on time
- Cure
- Fit a new bearing, with careful cleaning
- Regrind the journal if needed
- Tell the owner to change the oil, oil filter, air filter and crankcase breather filter as the manual says
- Clean or renew the oil mist separator and use only good filters
Particles behind the bearing
- Signs
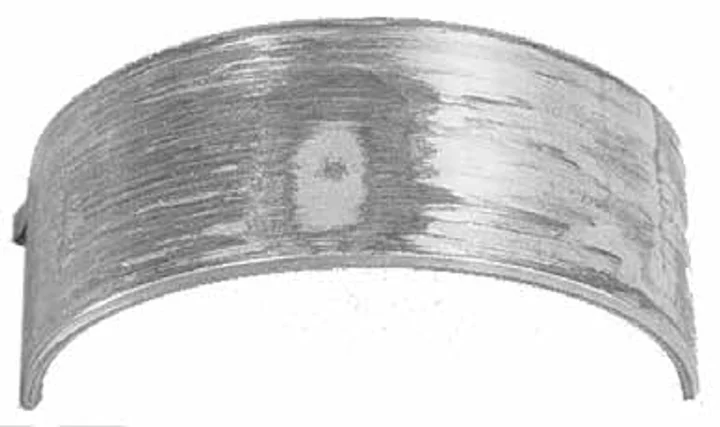
- Local wear on the running surface; directly behind it, a print of a particle on the bearing back or in the housing.
- What happens
- A particle between bearing and housing stops the whole back from touching its seat. Heat does not leave evenly, the spot overheats, and the load is uneven too.
- Causes
- Dust, abrasive or swarf that was in the engine at assembly, or made by deburring, and stuck behind the bearing
- Poor machining, or oil holes in the crankshaft not deburred well enough
- Cure
- Fit a new bearing after cleaning and deburring every surface; wipe the bearing with a soft cloth before fitting
- Carefully deburr the oil holes after machining the journals
- Check the journal and regrind it if it is worn
Misassembly and shifted cap
A bearing that is fitted wrong cannot work right, and usually fails early.
Misassembly
- Signs
- The wear depends on the mistake; mostly unusual wear or a hot spot in one area.
- What happens
- Check these six common mistakes before you tighten any cap:
- Causes
- The offset of the connecting rod is the wrong way round
- Shims are not fitted properly
- Caps are in the wrong place or reversed
- A locating tab is not in its notch
- Upper and lower halves are swapped
- The bearing's oil hole does not line up with the oil passage
- Cure
- Run through these six points before every cap (details in the Engine bearing installation guide)
Shifted cap
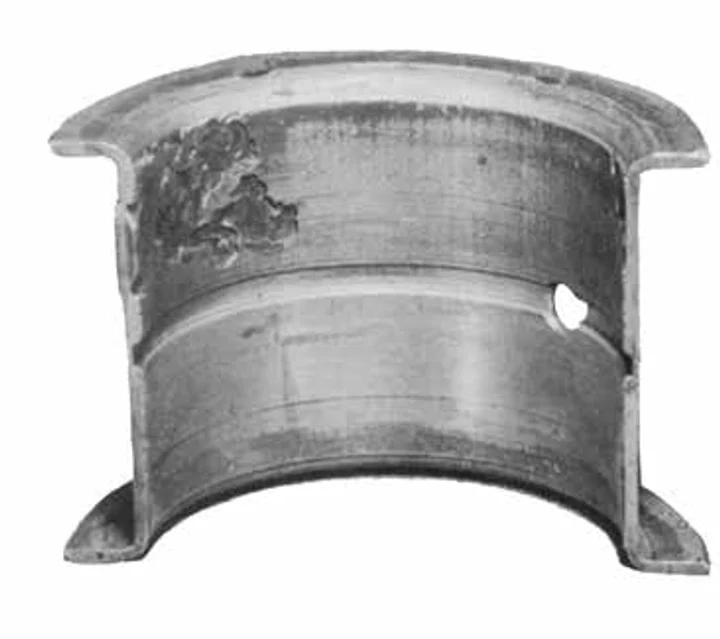
- Signs
- Heavy wear near the parting faces, on opposite sides of the upper and lower halves.
- What happens
- The cap has moved sideways, so one side of each half is pressed into the journal at the parting face; metal-to-metal contact under high pressure ruins the surface.
- Causes
- A socket that is too large and crowds the cap
- A cap fitted the wrong way round
- Missing or unsuitable dowels
- Bolts tightened wrongly so the cap works loose
- Enlarged bolt holes or stretched bolts
- Holes too small after the caps were re-machined
- A used rod with an oval big end fitted without re-machining the housing
- Cure
- Check the journal and regrind if needed
- Tighten with the right socket and the right dowels
- Tighten the bolts alternately from side to side
- Check the cap position and fit new bolts
- Watch the cap and cylinder numbers; check the big end and re-machine it if necessary
Crush
Each half stands a little proud of its housing so that tightening the cap presses it into the seat. That amount is the crush; too much or too little damages the bearing.
Too much crush
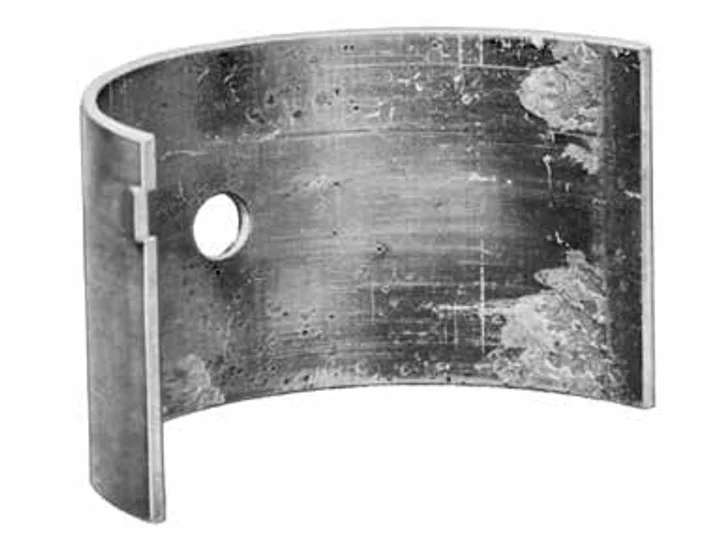
- Signs
- Heavy wear on the running surface next to one or both parting faces.
- What happens
- The extra pressure that is left once the bearing has seated makes it bulge inward at the parting faces (“side pinch”), and it rubs the journal there.
- Causes
- The cap was filed to reduce clearance
- The cap was tightened too hard
- Too few shims were fitted (where shims are used)
- Cure
- Re-work the housing if it has been filed, and replace a rod whose cap has been filed
- Check the journal and regrind if needed
- Never file a cap; tighten to the right torque
- Correct the shim thickness
- Check the roundness of the fitted bearing; its widest diameter must be across the parting line
Too little crush
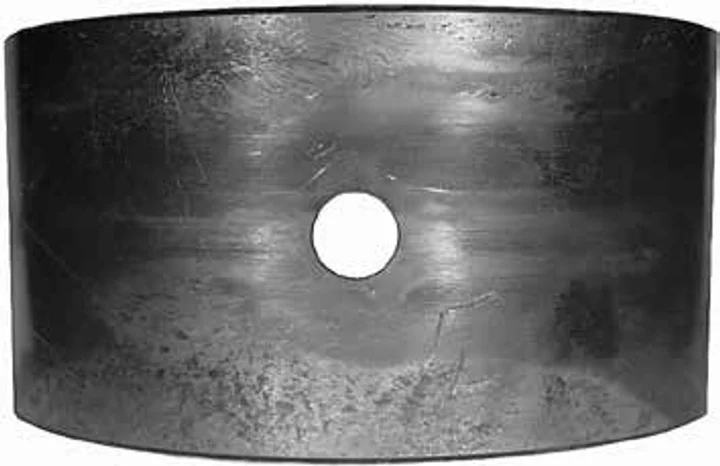
- Signs
- Polished spots on the back of the bearing or at the parting edge, and pitting or transferred metal between bearing and housing (fretting).
- What happens
- The bearing is loose and moves in its housing. Contact and heat transfer are poor, the bearing overheats and its surface breaks down.
- Causes
- The bearing's parting faces were filed “for a better fit”
- The cap was held open by dirt or burrs
- Too little torque (or a bolt bottoming in a blind hole)
- An oversize housing or a stretched cap
- Too many shims
- Cure
- Clean the cap mating faces and check them for nicks and burrs
- Check the journal and regrind if needed
- Check the housing size and condition and recondition it if necessary
- Correct the shims, and never file the bearing's parting faces
Bent rod and fillet ride
When the load falls on one edge instead of across the full width, that edge wears out early.
Bent or twisted rod
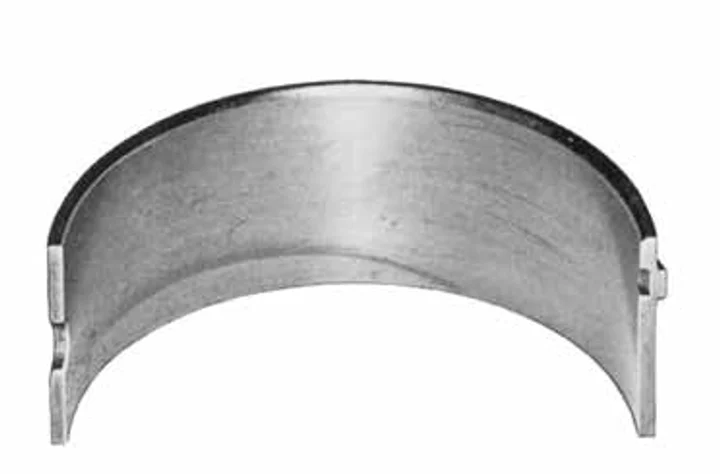
- Signs
- Wear at opposite ends of the upper and lower halves; local on one part of the surface, with little wear elsewhere.
- What happens
- A bent rod puts the housing out of line and the bearing sits cocked, so its edge touches the journal metal to metal.
- Causes
- Hard running, such as sudden over-revving or lugging under load
- Hydraulic lock (liquid in the cylinder) that bent the rod
- The rod was not straightened and aligned before fitting
- Poor reconditioning
- The rod was dropped or knocked before assembly
- Cure
- Check the rod and straighten or replace it if it is bent or twisted
- Check the journal and regrind if needed
- Do not drop or knock rods
- Check the related parts of the upper engine and replace them if necessary
Fillet ride
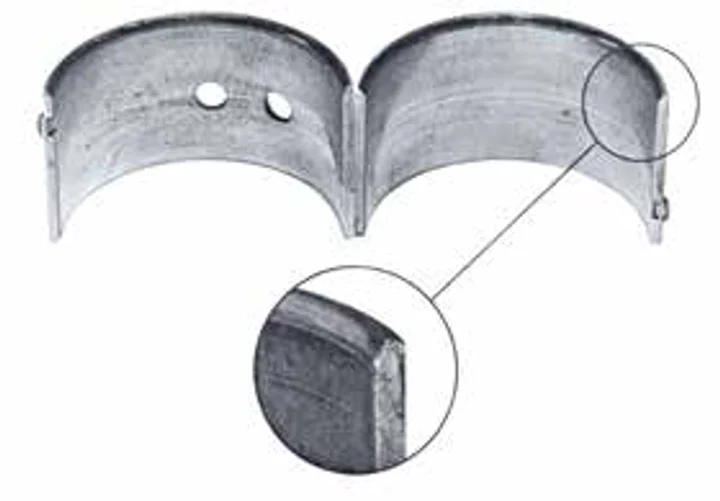
- Signs
- Heavy wear on the outer edges of the running surface.
- What happens
- If the fillet where the journal meets the web is larger than it should be, the edge of the bearing rides on it, and the metal-to-metal contact soon tires the bearing.
- Causes
- Oversize fillets left when the crankshaft was machined
- Cure
- Regrind the crankshaft to the allowed fillet radius; do not make the radius too small, or you weaken the shaft at its most critical point
- Fit a new bearing with a larger edge chamfer to give the fillet room
Distorted block and bent crankshaft
When the block or crankshaft is bent, the main bearings are not loaded equally; the middle ones carry the most.
Distorted block
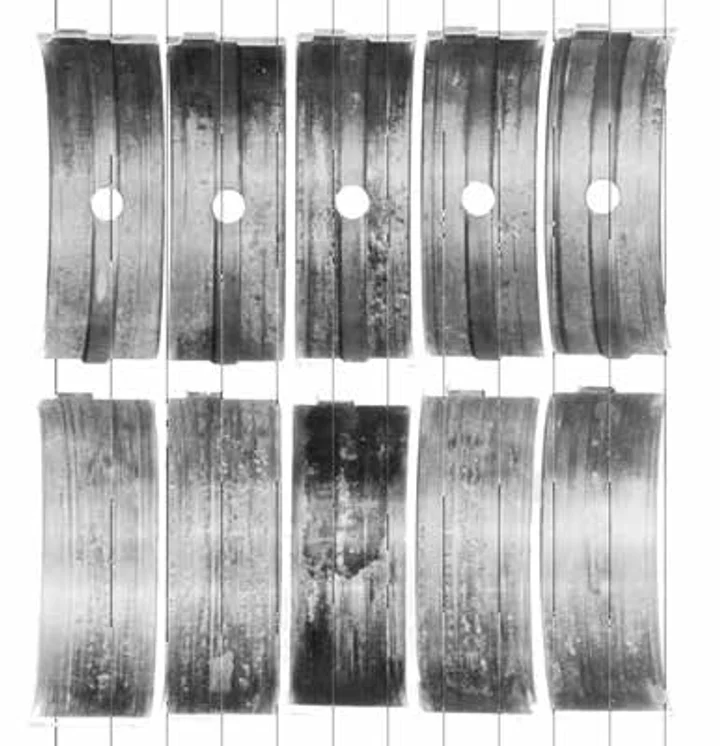
- Signs
- Wear on the upper or lower halves of the whole set of main bearings; the amount varies and the centre bearing usually wears most.
- What happens
- The block overloads the bearings, most where it is bent most. Oil clearance drops there and metal-to-metal contact is possible.
- Causes
- Repeated heating and cooling that slowly bends the block
- Overheating, for example from too little coolant, which bends the block for good
- Hard running, such as overheating and lugging
- Cylinder head bolts tightened wrongly (especially on V8 engines)
- Cure
- Check for distortion with Prussian blue or by eye
- Align-bore the housings if needed
- Fit new bearings
Bent crankshaft
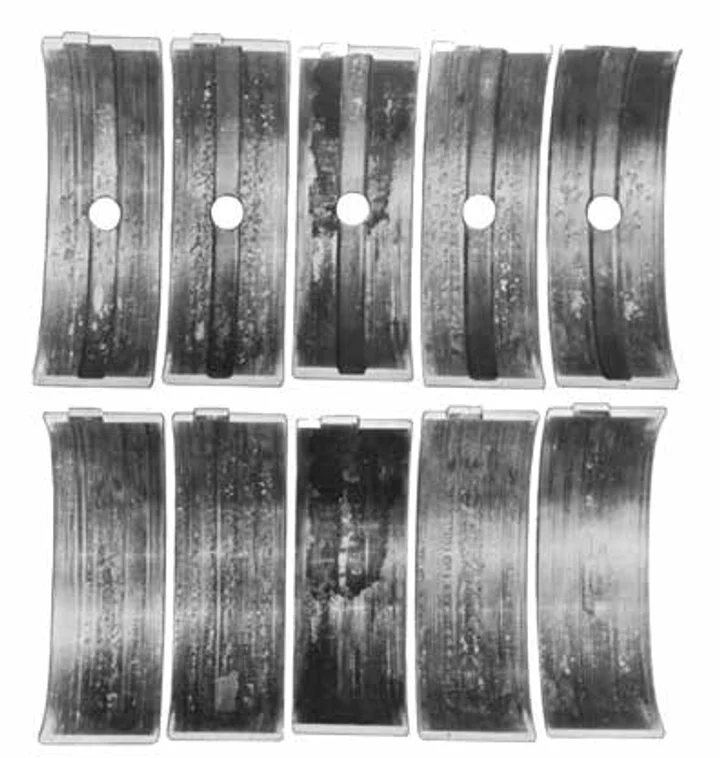
- Signs
- The same pattern as a distorted block: wear on all the main bearings, most on the centre one.
- What happens
- A bent crankshaft overloads the main bearings and cuts the oil clearance where it is most bent.
- Causes
- Hard running, such as over-speeding and lugging under heavy load
- Rough handling or storage before fitting
- The crankshaft was not properly straightened before refitting
- Mechanical overload, for example a seized piston
- Cure
- Check the bend with Prussian blue or by eye
- Straighten the crankshaft fully or fit a new one
- Check the cooling system (coolant, oil, thermostat, fan) and the torque and order of every bolt in the manual
- Fit new bearings
Out-of-round bore and journal
A new bearing takes the shape of its housing and runs on the journal; if either is out of shape, the bearing runs out of shape too.
Oval housing bore
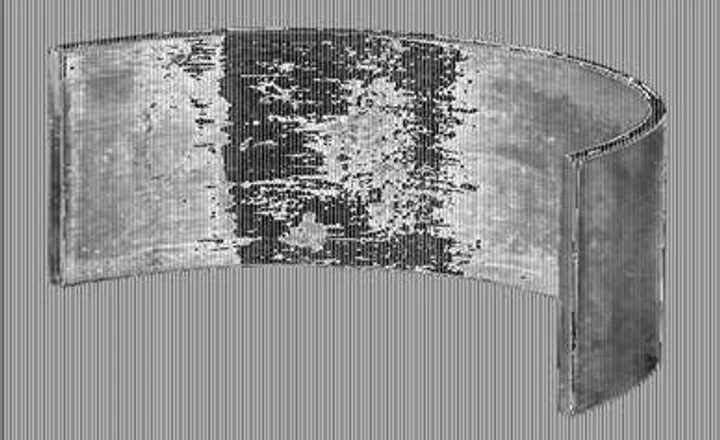
- Signs
- Local wear near the parting faces, on both upper and lower halves.
- What happens
- Oil clearance near the parting face falls so far that the bearing touches the journal metal to metal. Poor seating of the back also reduces heat transfer and overheats the surface locally.
- Causes
- Repeated loading and flexing of the rod stretches the housing, and the new bearing follows its shape
- Cure
- Check the roundness of the housings before fitting
- Recondition the housing or replace the rod
- Check the journal and regrind if needed
- Fit new bearings
Out-of-shape journal
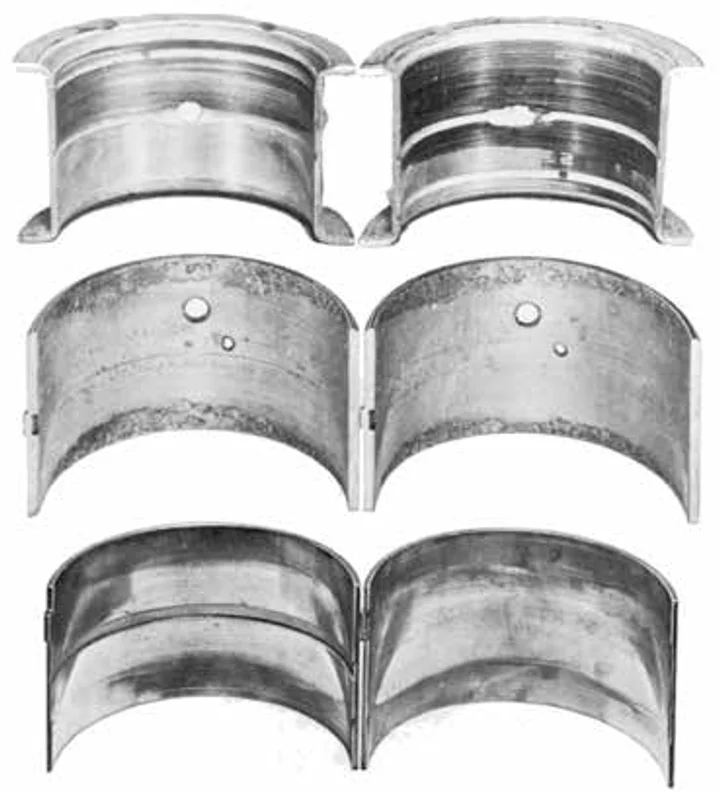
- Signs
- Uneven wear: tapered (left), hour-glass (middle) or barrel-shaped (right).
- What happens
- A journal out of shape loads the bearing unevenly, makes more heat, and leaves the oil clearance too small in one place and too big in another.
- Causes
- Taper: uneven wear in service (misaligned rod) or poor machining
- Hour-glass or barrel: usually poor machining or polishing
- Cure
- The best cure is to regrind the crankshaft
- Then fit the new bearings as the installation guide describes
Oil starvation and seizure
Once the oil film is gone, the bearing runs metal on metal and goes from shiny to seized step by step.
Oil starvation
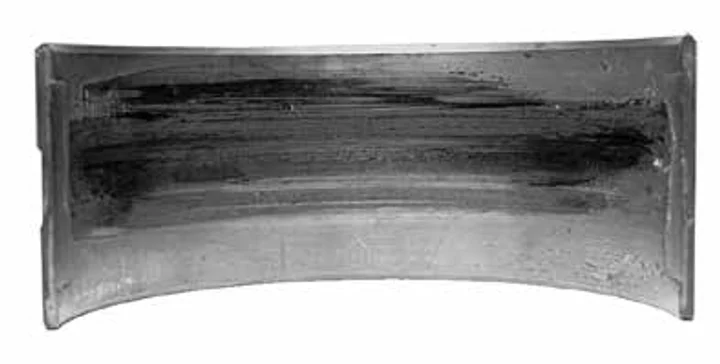
- Signs
- A very shiny surface with heavy wear; in the worst cases wiped, scratched and torn. The colour turns dark blue to black.
- What happens
- Without enough oil between bearing and journal the metals touch and wipe against each other, and the bearing soon tires.
- Causes
- Too little clearance: a bearing with a thicker wall than it should have, or an oversize journal
- A broken or blocked oil passage
- A blocked suction screen or oil filter
- A faulty oil pump or relief valve
- An oil hole closed off by a wrongly fitted bearing (only one of the two halves has an oil hole)
- Clogged oil holes; biofuels cloud the oil and raise the risk
- Leaking oil lines, low oil level, or a very steep vehicle angle
- The oil system was not primed before the first start
- Cure
- Recheck every measurement used to choose the bearing and check the clearance with Plastigage at assembly
- Make sure the new bearing is the right one for this engine
- Check the journals and regrind if needed
- Inspect the oil passages, screen, filter, pump and relief valve
- Check that the oil holes line up
- Check the oil level and top up; with biofuels shorten the oil change interval
- Always prime the oil system before the first start
Seizure and welding to the journal
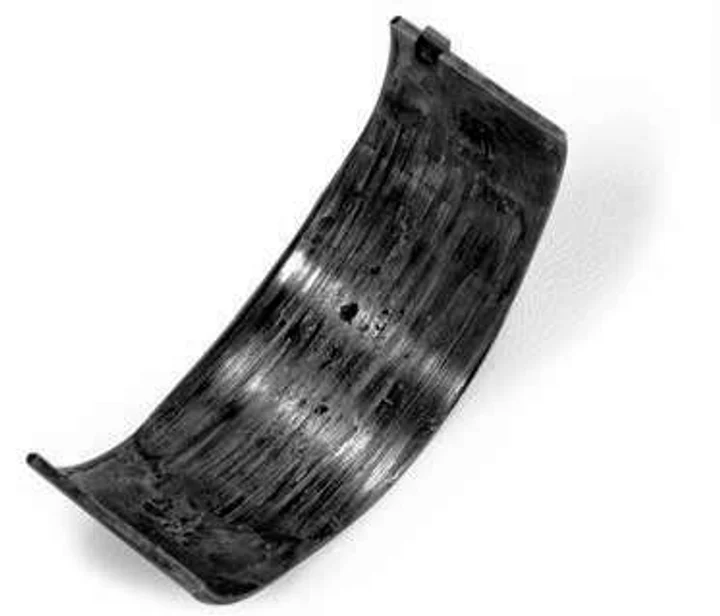
- Signs
- First very shiny spots; if the engine keeps running with too little oil the bearing turns blue and then black; in extreme cases the lining melts, the bearing spins or welds itself to the journal.
- What happens
- This damage always comes from too little lubrication. The key is to see whether one bearing is damaged or all of them.
- Causes
- If only one is damaged: the half was fitted the wrong way round and closes the oil hole of its seat, or the oil hole is clogged (especially with biofuel)
- If all are damaged: a general lack of oil; a faulty or leaking pump, a faulty pressure valve, a low oil level or a very steep vehicle angle
- Cure
- Fit the bearings as the manual says and check that the oil holes line up
- Change oil and filter on time; shorter intervals with biofuel
- Check the oil level and top up if needed
Hot short and back wear
Too much heat strips the lining from the steel; and the back of a bearing carries marks that show it was loose.
Shiny, worn or pitted back
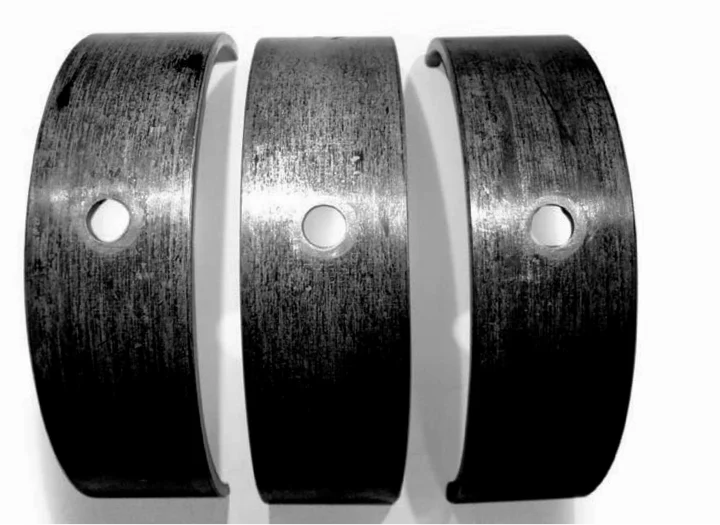
- Signs
- Bright marks and wear in the circumferential direction, or fine pits, on the back of the bearing.
- What happens
- If dirt is left in the parting line of the housing or the cap bolts are not tight enough, the bearing has too much clearance in its seat; it vibrates there and its back wears.
- Causes
- Dirt between the two halves of the housing (the parting line), which loosens the bearing
- Cap bolts not tightened enough
- Cure
- Take cleanliness seriously at assembly; wipe the bearing and the housing parting line with a soft cloth
- Check the cap bolts against the manual and renew them if necessary
- Tighten to the torque and angle in the manual
Hot short
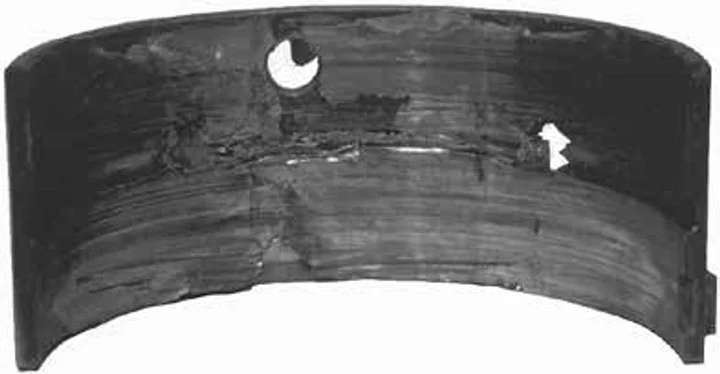
- Signs
- A wiped, torn running surface, blackened by heat, with patches of lining torn cleanly from the steel back.
- What happens
- When lubrication fails, friction and temperature rise. In bearings with lead, the lead softens and the journal tears patches of lining away.
- Causes
- Lack of lubrication
- Wiping and tearing of the lining
- Dirt
- Concentrated load (for example misalignment)
- Cure
- A hot short is not a cause but the result of one of the other items in this guide; find out which
- Use the symptom chart and go back to the sections on dirt, misassembly, crush, misalignment and oil starvation
Fatigue and corrosion
These two are usually the work of time and conditions: heavy pulsating load, or oil that has turned acid.
Surface fatigue
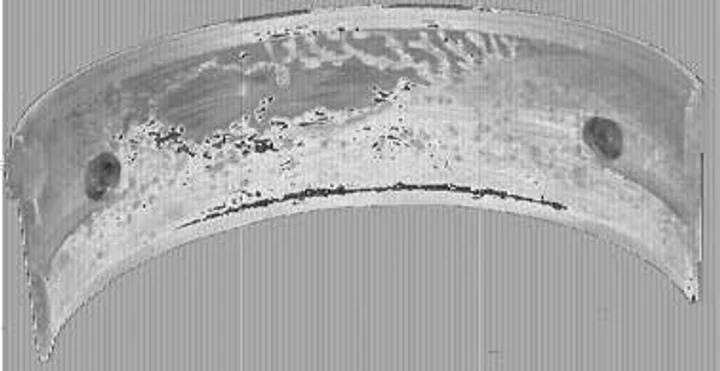
- Signs
- A cracked surface with small irregular areas of lining missing.
- What happens
- Heavy pulsating loads crack the surface. The cracks widen and deepen perpendicular to the bond line, then turn and run parallel to it, and pieces flake out.
- Causes
- Overloading (lugging, detonation, overfuelling)
- Uneven loading (see the sections on misalignment)
- A bearing material with too little fatigue strength for the job
- The bearing has simply passed its normal life
- Hydraulic lock that bent a rod, or extra load from tuning
- Poor oil, or oil contaminated with fuel or coolant, which lowers the load capacity of the oil film
- Cure
- If the old bearing lasted long enough, fit the same type; if its life was too short, fit a heavier-duty bearing
- Replace all the other bearings (rod, main and camshaft bushes) too; their remaining life is short
- Check the assembly and fit properly
- Use only oils approved by the engine maker
Corrosion
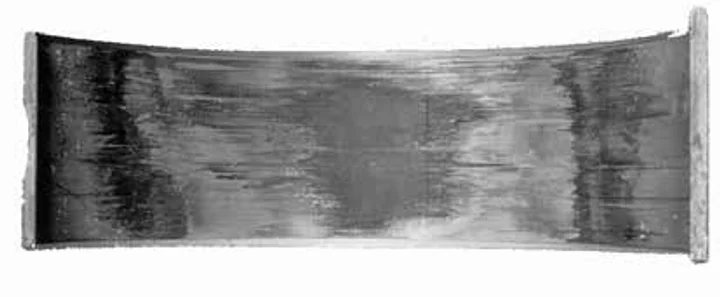
- Signs
- A dark, spongy surface, etched by chemical attack.
- What happens
- It usually comes from oil contaminated by fuel or internal leaks; poor maintenance makes it worse.
- Causes
- Acids in the oil
- Excessive operating temperature
- Excessive blow-by
- Coolant in the oil
- High-sulphur fuel
- Oil changed too rarely
- Oil turned acid by gas-fuelled operation (LPG, CNG)
- Cure
- Find and cure the source of contamination
- Fit new bearings correctly
- Use better fuel if you can
- Change the oil at the recommended interval with the right grade; oil analysis can show the best interval
- Check the cooling system regularly for leaks and loss of water
Journal finish
A journal that has not been ground and polished with care will wear even a new bearing.
Accelerated wear
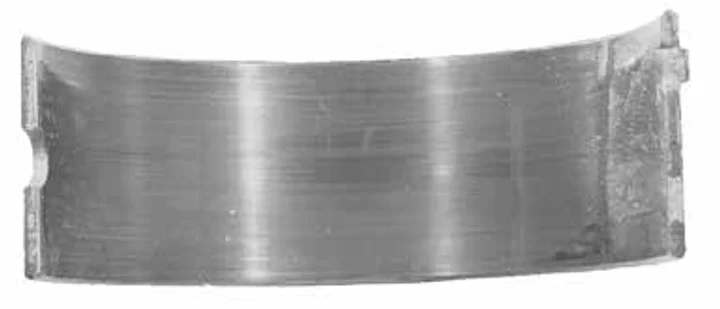
- Signs
- The wall is thinner than new; the surface is worn and polished but not wiped, torn or scored, and shows no heat or embedded particles.
- What happens
- Grinding and polishing leave tiny burrs you cannot see or feel. If the finish is not right, or the polish runs the wrong way, the peaks in the surface break the oil film and grind the bearing away.
- Causes
- A poor journal surface finish
- Cure
- Measure the surface finish and regrind if needed
- If it is acceptable, polish lightly in the direction of rotation
- Fit new bearings
Direction of grinding and polishing
- Signs
- The rule: grind the journal against the direction the engine turns, and polish it in the direction the engine turns.
- What happens
- Every grinding or polishing pass leaves tiny burrs with a grain, like the hair on a dog's back. Polishing the opposite way to the grinding bends them over and removes them; the result is a surface that strokes the bearing in the engine's direction of rotation instead of scratching it.
- Causes
- Take no more than 0.005 mm off the diameter when polishing
- Take extra care with nodular iron: grinding opens the graphite nodules and leaves ragged edges that proper polishing removes
- If the crankshaft turns anticlockwise (some marine engines) reverse the directions
Early thrust bearing failure
A thrust bearing runs on two flat faces with a thinner oil film; even a small load can destroy it.
Why thrust bearings fail early
- Signs
- The thrust face is worn through to the steel; usually the crankshaft thrust face is badly damaged too, and no other main cause shows.
- What happens
- A radial bearing draws oil under load with its own wedge shape. A flat thrust face has no wedge; grooves and ramps help it. If the load is too high the film collapses and the surfaces stick together.
- Causes
- Poor crankshaft thrust-face finish: grinding marks (swirls or crosshatch) act like wipers and clear the oil film; the face should have only a fine circular polish
- Misalignment: the wheel must dress the thrust wall at 90 degrees, and the thrust bearing must be seated properly
- External load from the gearbox, the clutch and their parts
Fitting a thrust bearing properly
- Tighten the cap bolts lightly (about 15 to 20 N·m) to seat the bearing, then loosen
- Tap the cap toward the rear with a soft hammer and run the bolts down by hand
- Force the crankshaft as far forward as it will go and hold it to line up the thrust faces
- Tighten the bolts lightly in that position, then to the maker's torque in two or three equal steps
Ask about external loads
- High pump pressure or torque converter expansion in an automatic gearbox
- The wrong torque converter, flex plate or flywheel bolts
- Engine and gearbox out of line, missing dowels
- A badly adjusted release bearing, or resting a foot on the clutch pedal
When you inspect
- Is there any sign of lubrication trouble or dirt elsewhere in the engine?
- Were the right bearings fitted? Is the nearby oil seal seated correctly?
- Look at the undamaged crankshaft thrust face for finish and shape
- Leave at least about 1.6 mm between flex plate and torque converter so it can expand
Camshaft bushes
Camshaft bushes work under more load and heat in today's engines, so fitting them calls for more care.
Preventing early camshaft bush failure
- Signs
- The old soft lining (babbitt) could not stand high load and temperature and would extrude or tire; today's harder alloys carry more load but forgive less dirt, misalignment and poor lubrication.
- What happens
- The harder bushes do not wear in to make their own clearance. So the clearance must be right from the start, and cleanliness, alignment and finish matter more.
- Causes
- Clearance not measured at installation, or too small
- Honing the bush to open the clearance (hone grit embeds in the surface and wears the shaft)
- The back of the bush was shaved while pressing it in and the clearance fell
- The oil hole of the bush does not line up with the oil passage in the block
- Cure
- Measure the clearance at installation and set it as the manual says
- Adjust the clearance by grinding the camshaft journal rather than honing the bush, and polish the journal with the camshaft turning the way it will in the engine
- Check that the housing entry has a 25 to 30 degree lead-in chamfer before pressing the bush in
- Line up the oil holes; if the block has a groove behind the bush, place the hole as the manual says
Symptom chart
Keep the failed bearing next to this chart; the last column gives the page with the full explanation.
| Sign on the bearing | Likely cause | See |
|---|---|---|
| Embedded particles and scoring on the running surface | Dirty oil, poor cleaning, filters | See |
| Local wear with a particle print behind the bearing | A particle between bearing and housing | See |
| Wear by the parting faces, on opposite sides | Shifted cap | See |
| Wear by both parting faces | Too much crush | See |
| Shiny or pitted spots on the back | Too little crush, loose bearing | See |
| Wear at opposite ends and opposite edges | Bent rod | See |
| Wear on the outer edges | Oversize fillet | See |
| Most wear on the centre bearing | Bent block or crankshaft | See |
| Wear near the parting faces, top and bottom | Oval housing bore | See |
| Tapered wear, both edges or the middle | Out-of-shape journal | See |
| Shiny, blue to black, wiped surface | Oil starvation | See |
| Patches of lining torn off, black from heat | Hot short (the result of other causes) | See |
| Shiny marks or fine pits on the back | Dirt in the housing parting line or loose bolts | See |
| Shiny, then blue and black; bearing spun or welded | Too little lubrication (one bearing or all) | See |
| Cracks and flaked-out pieces | Surface fatigue | See |
| Dark, spongy surface | Corrosion | See |
| Thin wall, polished surface without scoring | Poor journal finish | See |
| Thrust face worn to the steel | Finish, misalignment or external load | See |
What to do next
The right job is not just changing the bearing; it is finding and curing the cause.
- Keep the evidence. Mark the removed bearings with their order and position, do not throw them away, and photograph them.
- Look at every bearing. The pattern across several bearings often makes the cause clearer; for example most wear in the middle means a bent block or crankshaft.
- Use the symptom chart to guess the cause. If more than one cause is possible, check them all.
- Measure the parts. Measure the journals, housings and rods against the installation guide; check the oil passages, screen, filter and pump too.
- Cure the cause, not just the bearing. Repair or replace the part that is not right.
- Fit the new bearing properly. As in the Engine bearing installation guide: clean, measure the clearance and tighten to the maker's torque.
- Prime the oil system and watch the pressure. Tell the owner to change the oil and filters on time and not to lug the engine.
Tip If the new bearing still fails early after all this, send us the bearing and the engine details and we will look at them together.